
In my previous post, I build a desktop for under $400. The vision for this computer is to become a media server that will be used (with some code and a password protected private Roku channel) to share videos and pictures to the rest of our family.
My Grandparents are technilleterate. They can operate a DVD player, though. I like Roku because of it’s simplicity and developer guides. I’ll build the media server using Ubuntu with a Roku service running on it. I plan on backing up media (and D’s business stuff) to a Rackspace cloud files endpoint probably once a week.
Why build a machine to do this and not use a cloud server? 2 reasons:
1. I don’t know anything about overclocking a CPU and would like to learn.
2. I’d like to have a playground to test out a home-based private cloud with Xen hypervisor support. This new machine with my other ubuntu server will be the hardware for the private cloud.
So first step in this endeavor is to get Ubuntu on the new machine. I chose the desktop version over server since I’ll be using it to do any Roku interface development required. Plus, I’m interested in what the desktop experience is (can a windows/mac user convert to ubuntu easily?). It really doesn’t matter if you choose desktop or server as you can apt-get install any packages you need.
Here’s how to install ubuntu desktop:
1. Go to http://www.ubuntu.com/download/ubuntu/download and get the latest version. Download it and put it on a USB stick. The download is 697MB, so it could take a while depending on your connection.
2. Follow step 2 on http://www.ubuntu.com/download/ubuntu/download – downloading the USB installer.
3. In the USB installer, select the ubuntu version you downloaded in #1. Then browse to the iso file.
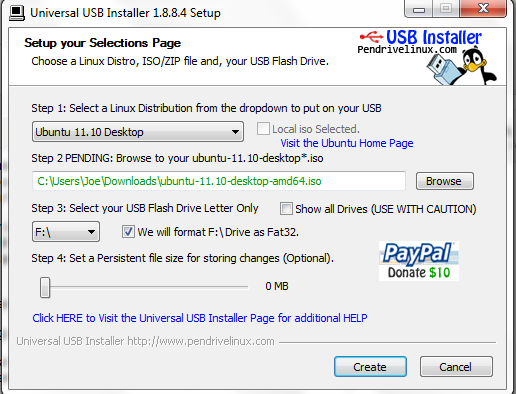
4. Plug in a USB stick to a working, networked computer – and click on Create in the USB installer. The USB installer will use 7ZIP to extract contents to the USB stick and make it a bootable USB. This process will take about 5 minutes.
5. Plug in the USB stick to your new computer. On boot, hold down the F12 key and select USB-FDD to boot from.
6. Select “Install Ubuntu on Hard Disk. Soon enough you’ll see the “ubuntu” logo with the 5 red loading dots.
7. At this point, Ubuntu will do a hardware inventory – understanding what peripherals you installed, where your Hard Drive is, and what USB devices you may have plugged in. If you see “read/8, error -110” during this process, that’s normal. It’s just trying to communicate with devices that may not be installed.
8. The UI will load and ask you basic information, setting up the time zone and your user credentials. It does a check to make sure you have enough hard drive space for the OS and also checks internect connectivity (for the latest updates). The internet connection is not required to install the OS. When it’s done, it’ll ask to restart.
9. When it comes back on, attempt to connect it to a network (wired or wireless). I plugged in a Cisco WUSB100 USB wireless adapter to see if I could get it working (I’ve hard problems on the Ubuntu 11.10 server edition). It works like a charm with the desktop edition. : )
10. On the panel on the left is an icon called “Update Manager”. Open it and click “Install Updates”. It may ask for the root password you supplied in step 8.
That’s it! Now you have a fully functioning ubuntu machine. 🙂
Next up:
Installing and configuring IDEs (interactive development environments) on your Ubuntu desktop.

Leave a comment